Many people requested USB power and back lighting for the clock. We didn’t want our SKU’s exploding with combinatorial options, but we did want to try to accommodate people with some simple features on our circuit board.
The design philosophy was to minimize rework by onlyadding components, not changing components. Because some power circuitry was already on the board, we convert from USB voltage (5.0v) to single AA battery voltage (1.5v), effectively “mimicking” a battery, so nothing else on the circuit board is affected. The component placement also creates a physical interlock with the battery clips, making it impossible to install a battery with USB power applied, a potentially messy condition.
The schematic diagram can be found on Github here.
That being said, this is all provided as our well intentioned advice. We can’t guarantee the quality of your work or your parts, so think of it as voiding the warrantee.
USB Power Block
There is a location for a USB micro connector, but we find them difficult to solder, and the physical footprint on the circuit board varies from manufacturer to manufacturer. Rather, if you cut the end off a USB cord, you’ll see the following.
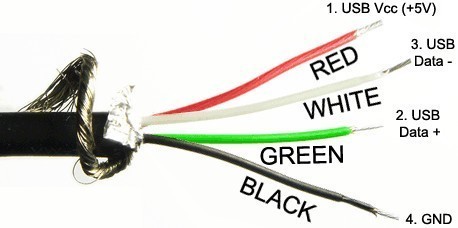
We only need the power lines, the white and green data lines can be ignored. Solder the power lines to connector location P4, with the red wire going to +5v, as shown below.

Components C7 and U2 need to be placed. A generic 1μF capacitor will work and an LDO Regulator that outputs 1.5v should be fine. (Check the pinouts, they vary across manufacturers.) The screen print on the circuit board lists a regulator we picked out, MCP1702-1502E/TO.
LED Lighting
Ports P2 and P3 provide a steady 2.0V to provide power for backlight LEDs. You’ll need to wire a resistor inline with the LED, but we leave the work of selecting those and orienting them to you.

To wire the LEDs in, there are some clips provided in the meter housing. To reach them, gently pull on the clear plastic meter cover until it pops off.

The arrows point to the LED holder and wiring clips. the locations marked with an X need to be drilled out and also drilled through the metal case.

Software Controlled Extras
A number of features, like SP1, D2, and D3 on the circuit board are software controlled and meant for an Alarm Clock version to be developed at a later date. There’s a minor error in the transistor network near SW1 that can be cut and jumped around for an alarm clock, but has no impact on the behavior as delivered as a regular AWK-105 Clock.
