Update: Since there were numerous requests for the CAD model, I’m happy to share the link to Onshape where the model was made!
https://cad.onshape.com/documents/421e2766742c23aa68e4a297/w/1da03d7271c82f7325d7c4ce/e/987c604fce047318598fceb4?renderMode=0&uiState=662cf1d04cd0aa794709e886
Hi all,
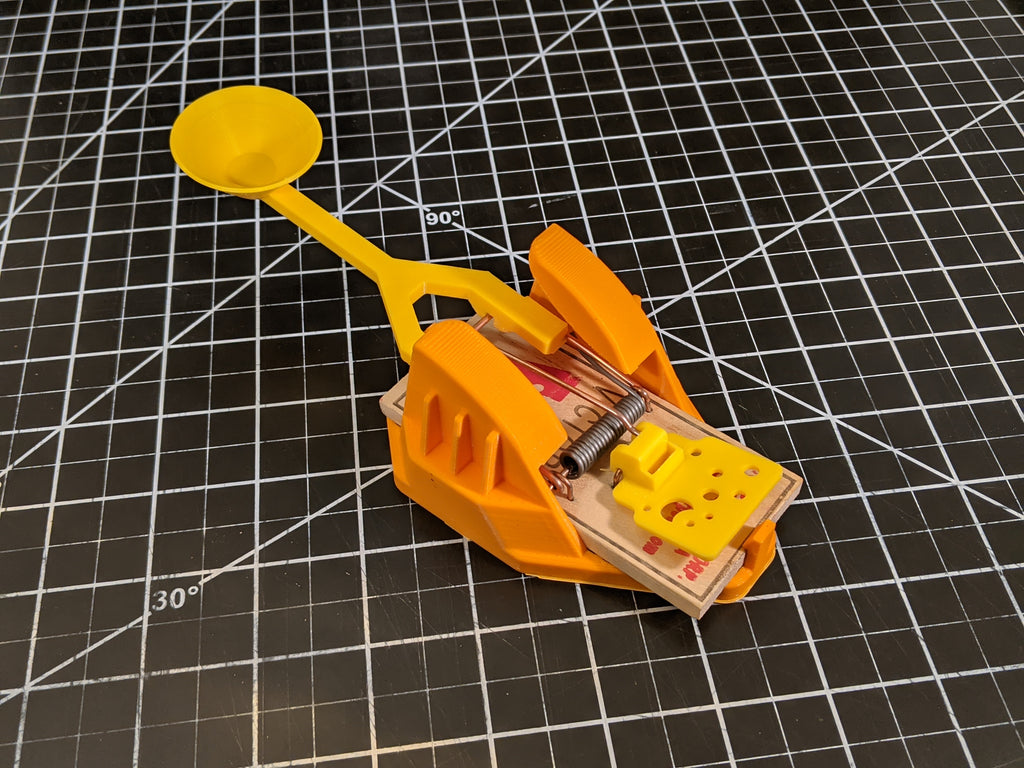
Today's post is about advancing the state of the art in mouse trap driven catapult design. We'll meander for a bit and talk about the backstory and motivation, but the punchline is that I have a design for a mass producible, injection moldable catapult. It features a snap-on throwing arm that fits over the kill bar of a traditional "snap trap", and then the trap itself snaps into a plastic frame which controls the throwing angle and keeps fingers safe. It'll throw a marshmallow about 6-8 ft. Oh, and my favorite design feature, is that the mouse trap's trigger mechanism is kept intact.
Backstory: There's a mouse in the house!
The story starts several months ago with the discovery of a mouse in the house. I mean, we found evidence of droppings, and some mouse sized holes in an instant ramen packet and a box of Cheerios, and then one day I actually saw one scamper across the kitchen.
My wife has a true, stomach churning phobia of mice, so we hired a service that came and filled up all the air gaps around the house and left around 60 or 70 traps in every nook and cranny.
To their credit, it's been several months, and nary a mouse has been seen, live or dead, but from my point of view, these mouse traps are now being underutilized. So I started thinking about what I could make with them.
Mouse trap powered cars were a thought, but catapults just seemed more fun.
Backstory Part 2: The Interview Question
This is a total tangent, but when interviewing engineers, I often asked a question about keeping a chicken egg warm and incubated until it hatched. The question starts with a scenario where it's necessary to hack something together with materials from around the house, then progresses to more and more sophisticated builds. Once the chicken egg is safe, I start asking the candidate to start thinking longer term, and maybe not having an ugly recycled cardboard box and a heating pad in my living room.
This question certainly weeds out bad engineers, and most mechanical engineers can start talking through what would be necessary for a more repeatable, scalable, durable, attractive build.
The best answer by far though, went something like this.
"So the chicken egg is safe for a little while, and I have a few days to come up with something nicer?"
"Yes."
"Well, chicken incubators sound like a thing that already exists. I'd look on Amazon to see if I could just buy one."
The lesson here is not to engineer things when you can just buy them for a lot less time and trouble.
So I turned to the internet and did an initial search for mouse trap catapults. I was disappointed with what I found. Clunky CAD models. Popsicle sticks, spoons, and duct tape. And none of the designs used the trigger mechanism of the trap, which in my view, is half the fun! Nothing available on the internet, either for sale, or for download, would suffice! So I could tell myself I was fully justified in spending the effort on this. There was no buying what I wanted on Amazon. Time to design my own!
Dusting off My Engineering Hat
I've done a ton of work lately in program and product manager roles, and haven't done much heavy lifting on my own, but deep down, I tell people that there is still a mechanical engineer in there somewhere, so maybe I was just looking for an excuse to spin some CAD to make sure the skills hadn't fully atrophied and also play with my 3d printer.
Here's the process:
The Build: Initial Prototypes
Initial steps started with some sketching and some tinkering with popsicle sticks and duct tape to get a rough sense of proportions.

From there, I can get into rough CAD. The purpose of the first build was to start checking critical dimensions.

And as it turns out, I goofed on the first build... I tried to have the flat bar hit perfectly against a flat surface on the frame, and frankly, that's never gonna happen. I redesigned the surface with a curve, so that I would always have a flat on curve interface, which is much better from a wear point of view. I took a couple iterations to get the locations of all the necessary critical surfaces to locate the trap and the throwing stop.

At this point, I started playing with the throwing arm. The first one fit, but it had a habit of slipping off with repeated firings.
An iteration or two later and I had the throwing arm getting into shape. Eventually I tried to address wall thickness and make something manufacturable. I could certainly tweak this a bit more to eliminate the need for side actions, but it's close enough for my purposes and I wanted to put more time into the main body.

There were a couple false starts at making something manufacturable for the main frame. I really wanted a simple, two part mold, and wanted to avoid side actions or anything that would add cost to the part.

Because of the frame geometry, you need some access holes so the mold can "reach" to the underside of the part. I ended up in some places where I didn't like the aesthetics, so decided to start again from scratch.

Actually being able to hold the part, instead of spinning the 3d model, made me rethink a few things. In particular, I realized how much material was just being covered up by the mouse trap. This lead to another iteration.

Also, I thought that ribs on the top of the part, where the "stops" were might look OK, but when I saw the build I changed my mind. I took another crack at it. The build below was really getting somewhere!

I realized in the process of adding draft angles (the gentle slope to vertical surfaces that lets a part slip out of the mold) ended up squeezing some geometry on the mouse trap. Also, the snap hook features I made broke off when I was removing support material from the 3d print.
A few more small tweaks and I'm pretty happy where I ended up!


Wrap up
The mouse trap catapult is fun. I've been using marshmallows, crumpled balls of paper, and other small nuggets as ammo. The kids love them. Nothing compares to the satisfying "thwack" of the trigger being released.
I've set small ambushes around the house and I have the range dialed in to launch from my work-from-home desk to my wife's work-from-home desk.
Although the geometry is mass manufacturable, I have no current plans to tool up. I think driving that far with the geometry was as much about the "look" as anything else... when it's manufacturable, it just looks right, and doesn't look like a clunky 3d print.
Anyway, that's all for now!
best regards
Sam Feller
aka THE Awkward Engineer
p.s. some 3d printer footage for fun and a layout of all the prototypes


Hi! I love this design so i was just wondering if you could send me the 3d file so i could print it for myself. Thanks alot! I love how nice it looks as well!
Hi I would like to make cool projects with my 3d printer and this seems rlly fun would i be able to have the file for it if not thats all good. thanks for considering
Hey! Loved the design and I wanted to change it a bit to shoot a ping pong ball around 12 ft. Can I have the 3d model to print so I don’t have to start from scratch? I also agree it would be grate if you posted it on something like printables. Thanks.
MagicSmokeSTAT, I have your email from the blog management tools, will send you the files! you can also email questionsawkwardengineer.com
Dear Sam Feller,
We are writing to request the release of a video demonstrating the operation of the Catapult that you have recently displayed on your website. As per the Rule Book of the Internet Catapult Association, Chapter 3, Paragraph 2: “Any image, graphic, illustration, or realistic depiction of a Catapult in any format or medium is prohibited from being displayed, shared, published or released without the simultaneous provision of a video demonstrating the operation of the device, launching an object that is appropriate for the intended function of the construction.”
In the absence of the release of the video within the 10 bussiness days, we will have to remove your outstanding membership from the TOSSED organization. We hope you understand that this rule is important for our community and we appreciate your cooperation. Please let us know if you have any questions or concerns.
Sincerely,
Martin Meier,
Internet Catapult Compliance Officer at TOSSED,
The Organization of Superbly Skilled Engineers and Designers